|
|
||
|---|---|---|
| .. | ||
| app | ||
| image | ||
| templates | ||
| README.md | ||
| diagram.png | ||
| main.tf | ||
| outputs.tf | ||
| tenant-setup.yaml | ||
| variables.tf | ||
README.md
Binary Authorization Pipeline Blueprint
The following blueprint shows to how to create a CI and a CD pipeline in Cloud Build for the deployment of an application to a private GKE cluster with unrestricted access to a public endpoint. The blueprint enables a Binary Authorization policy in the project so only images that have been attested can be deployed to the cluster. The attestations are created using a cryptographic key pair that has been provisioned in KMS.
The diagram below depicts the architecture used in the blueprint.
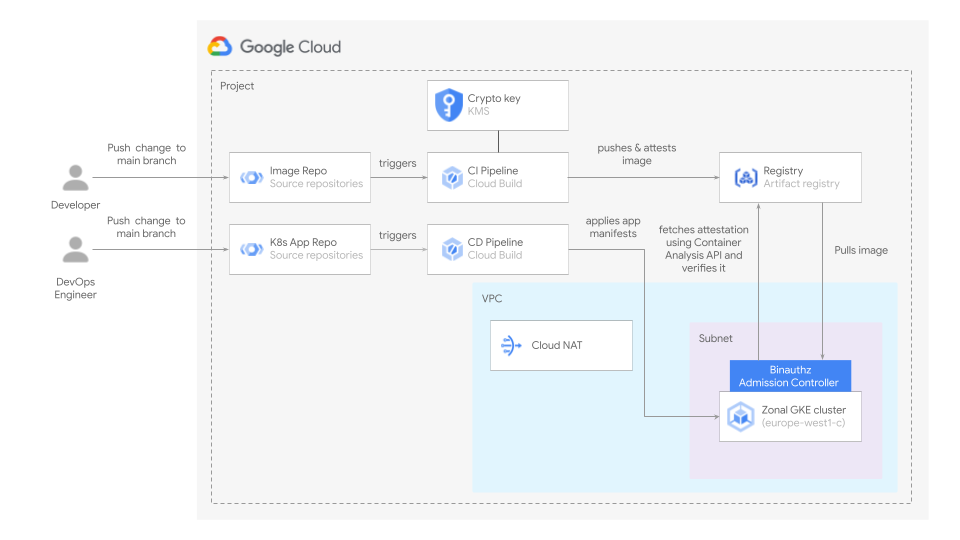
The CI and CD pipelines are implemented as Cloud Build triggers that run with a user-specified service account.
The CI pipeline does the following:
- Builds and pushes the image to Artifact registry
- Creates an attestation for the image.
The CD pipeline deploys the application to the cluster.
Running the blueprint
Clone this repository or open it in cloud shell, then go through the following steps to create resources:
terraform initterraform apply -var project_id=my-project-id
WARNING: The blueprint requires the activation of the Binary Authorization API. That API does not support authentication with user credentials. A service account will need to be used to run the blueprint
Testing the blueprint
Once the resources have been created, do the following to verify that everything works as expected.
-
Fetch the cluster credentials
gcloud container clusters get-credentials cluster --project <PROJECT_ID> -
Apply the manifest tenant-setup.yaml available in your work directory.
kubectl apply -f tenant-setup.yamlBy applying that manifest the following is created:
- A namespace called "apis". This is the namespace where the application will be deployed.
- A Role and a RoleBinding in previously created namespace so the service account that has been configured for the CD pipeline trigger in Cloud Build is able to deploy the kubernetes application to that namespace.
-
Change to the image subdirectory in your work directory
cd <WORK_DIR>/image -
Run the following commands:
git init git remote add origin ssh://<USER>:2022/p/<PROJECT_ID>/r/image git push -u origin main -
In the Cloud Build > History section in the Google Cloud console you should see a job running. That job is build the image, pushing to Artifact Registry and creating an attestation.
Once the job finishes copy the digest of the image that is displayed in the Cloud Build job output.
-
Change to the app subdirectory in your working directory.
cd <WORK_DIR>/app -
Edit the app.yaml file and replace the string DIGEST with the value you copied before.
-
Run the following commands:
git init git remote add origin ssh://<USER>:2022/p/<PROJECT_ID>/r/app git push -u origin main -
In the Cloud Build > History section in the Google Cloud console you should see a job running. The job will deploy the application to the cluster.
-
Go to the Kubernetes Engine > Workloads section to check that the deployment was successful and that the Binary Authorization admissions controller webhook did not block the deployment.
-
Change to the working directory and try to deploy an image that has not been attested.
cat <<EOF | kubectl apply -f - apiVersion: apps/v1 kind: Deployment metadata: name: nginx-deployment spec: selector: matchLabels: app: nginx replicas: 2 template: metadata: labels: app: nginx spec: containers: - name: nginx image: gcr.io/google-containers/nginx:latest ports: - containerPort: 80 EOF -
Go to the Kubernetes Engine > Workloads section to check that that the Binary Authorization admissions controller webhook did not block the deployment.
The application deployed to the cluster is an RESTful API that enables managing Google Cloud storage buckets in the project. Workload identity is used so the app can interact with the Google Cloud Storage API.
Once done testing, you can clean up resources by running terraform destroy.
Variables
| name | description | type | required | default |
|---|---|---|---|---|
| prefix | Prefix used for resource names. | string |
✓ | |
| project_id | Project ID. | string |
✓ | |
| deletion_protection | Prevent Terraform from destroying data storage resources (storage buckets, GKE clusters, CloudSQL instances) in this blueprint. When this field is set in Terraform state, a terraform destroy or terraform apply that would delete data storage resources will fail. | bool |
false |
|
| master_cidr_block | Master CIDR block. | string |
"10.0.0.0/28" |
|
| pods_cidr_block | Pods CIDR block. | string |
"172.16.0.0/20" |
|
| project_create | Parameters for the creation of the new project. | object({…}) |
null |
|
| region | Region. | string |
"europe-west1" |
|
| services_cidr_block | Services CIDR block. | string |
"192.168.0.0/24" |
|
| subnet_cidr_block | Subnet CIDR block. | string |
"10.0.1.0/24" |
|
| zone | Zone. | string |
"europe-west1-c" |
Outputs
| name | description | sensitive |
|---|---|---|
| app_repo_url | App source repository url. | |
| image_repo_url | Image source repository url. |
Test
module "test" {
  source = "./fabric/blueprints/gke/binauthz"
  prefix = "test"
  project_create = {
    billing_account_id = "12345-12345-12345"
    parent             = "folders/123456789"
  }
  project_id = "my-project"
}
# tftest modules=14 resources=49